In today’s digital world, the most important asset any firm can have is data and when we talk about its storage, database comes into picture. Today, we have multiple database software available in the market and in all of them, Oracle database is one of the most popular storage platform and its enterprise level database is trusted by many companies. So in this blog post, I will be explaining how to install and configure the Oracle database, version 12C on Linux platform.
If you have not configured your virtual machine yet then check out my previous post to properly set up your VM. Click here.
If you have followed my blog for VM setup, you must have found that I had selected the minimal install in the software selection so it won’t provide me any GUI.
Open your VirtualBox instance, you will get a black screen where you will be asked to log in with your username and password. Login with your root user and password since we have to do some changes and only the root user can perform that.
1. Set up the host file
To do this, go to the hosts file which is present in the etc directory.
vi /etc/hostsThis command will open the hosts file where we have to specify or bind our IP address with the hostname. To edit this host file, press i to start the Insert mode and then start writing.
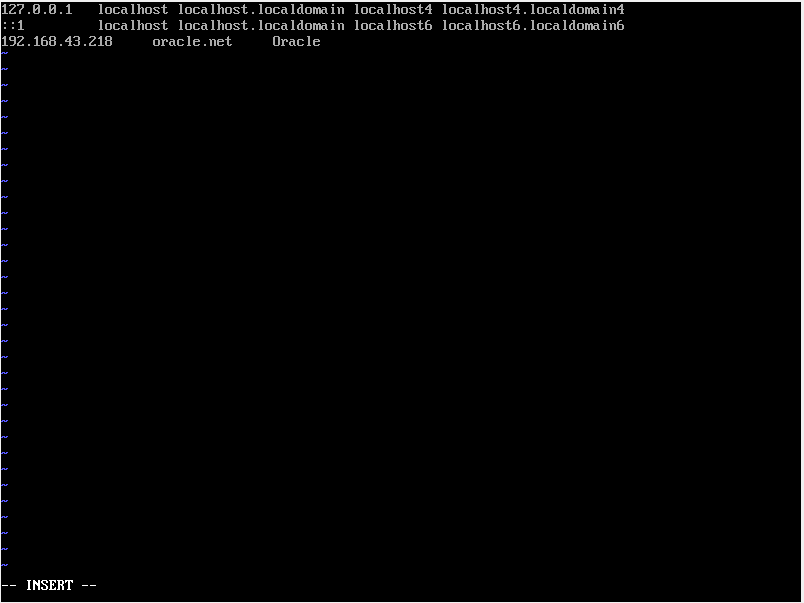
Here, 192.168.43.218 is my IP address and Oracle.net is my hostname. Keep in mind that the hostname should be a fully qualified domain name.
Once done, press the esc button to exit from Insert mode and then type :wq to save and exit.
We also need to make our IP address static so that if we change our network then the IP does not get affected. Since I forgot to do this process, I had made another post (Click this) to show this process. Kindly do this process and then move ahead.
2. Configure SELINUX
The second thing which we need to do is to disable the selinux because we don’t want it to intervene during our installation. To do this, first, we need to go to the below mentioned location and edit the config file. vi, here is one of the text editors which is used by Linux.
vi /etc/selinux/config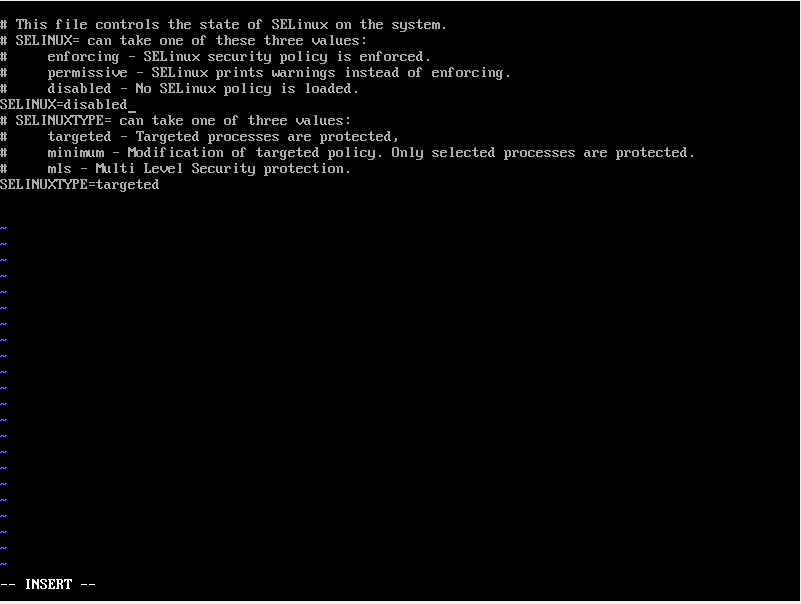
Change the SELINUX to disabled and then save and exit by :wq command.
3. Disable Firewall
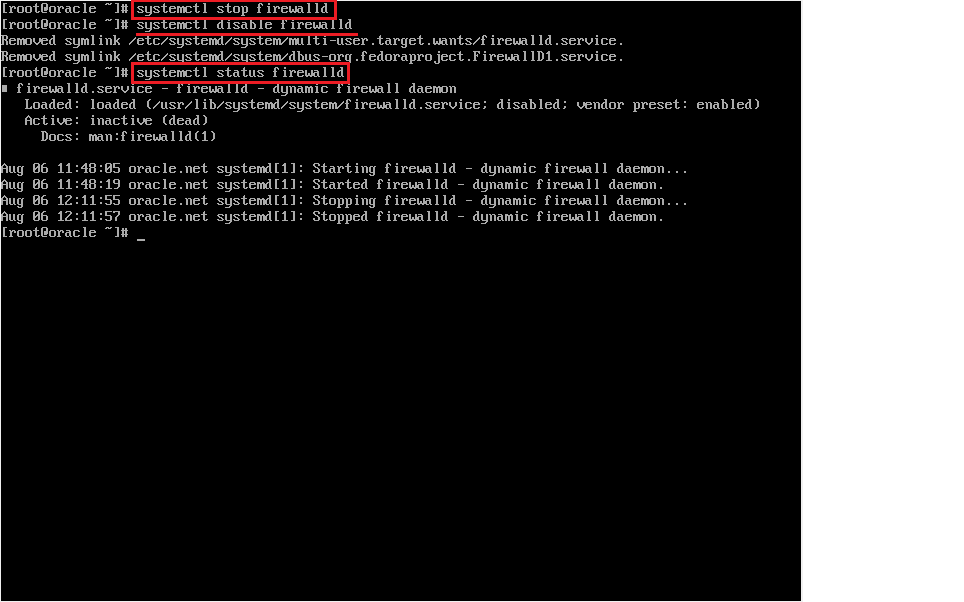
The firewall does not become a hindrance, we need to disable it as well. Use the below-listed command to stop and disable it.
systemctl stop firewalld
systemctl disable firewalld
systemctl status firewalld
systemctl stop firewalld will stop the firewall.
systemctl disable firewalld will disable the firewall.
To cross verify whether the firewall get disabled or not, use the command
systemctl status firewalld
After this, restart your instance by using the command init 6.
Now comes the main part. You might be wondering why I chose Oracle Linux instead of using RedHat or any other flavor of Linux. The reason behind this is, if we choose any other Linux flavor, then configuring it will be a very time taking process and if we leave any of the steps by mistake then we should be ready to tackle a list of errors. On the other hand, if we choose Oracle Linux, we just have to write one simple command and that will do everything for us, whether it is user creation or the YUM libraries, RPM files, and their dependencies. So let’s see how this single command can make our work easy.
yum -y install oracle-rdbms-server-12cR1-preinstallThe above command will take some time to finish and install all the required YUM libraries.

Once this is completed, run the yum update command to update all the libraries. Restart your Linux machine.
Now we need to create some directories. Let’s see how we can create that.
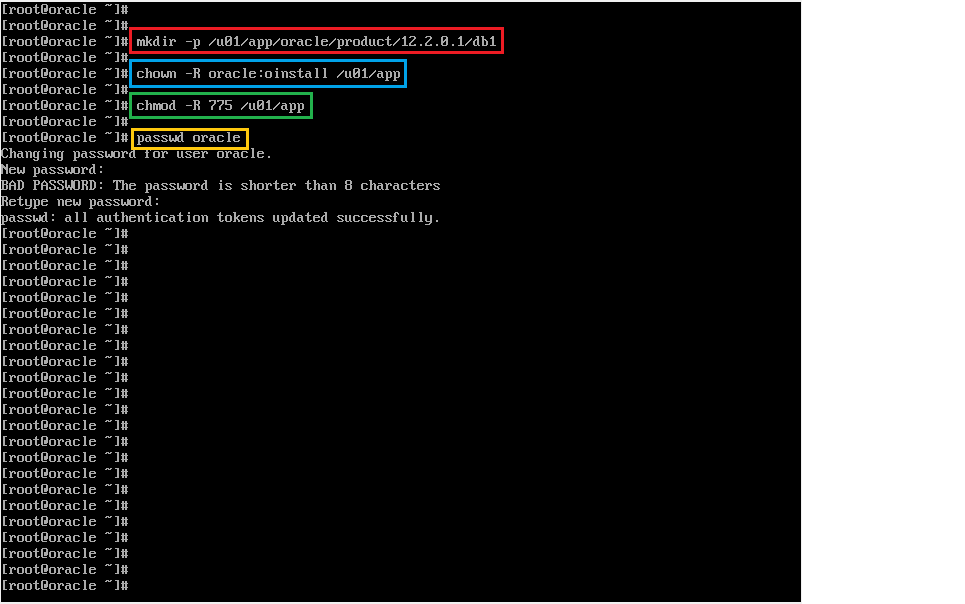
Before creating the new directory, make sure you are logged in as the root user.
mkdir -p /u01/app/oracle/product/12.2.0.1/db1Now we will change the ownership of the /u01/app directory from root to oracle user and oinstall group.
chown -R oracle:oinstall /u01/appYou might be confused about how come oracle user and oinstall group has come up when we have not created it yet. Actually, we have not created it but the yum -y install oracle-rdbms-server-12cR1-preinstall command did this for us. This is one of the reasons why we should choose the Oracle Linux for installation.
The next step is to change the permission for this directory. We have to change its permission to 775.
chmod -R 775 /u01/appChange the password for the oracle user. To do that, use the below command.
passwd oracleThis will ask you to type the new password and to authenticate it again. Once done, restart the Linux instance.
Now login with the oracle user and the next thing we need to do is to update the bash_profile. It tells oracle where to look for the files while installing the software. Use the below-mentioned command to open and edit the bash_profile.
vi .bash_profileAdd the below listed script in your bash_profile and save it by typing :wq. If you have specified any other path for ORACLE_HOME or any of your values are different, then use that.
#Oracle Settings
export TMP=/tmp
export TMPDIR=$TMP
export ORACLE_HOSTNAME=oracle.net
export ORACLE_UNQNAME=orcl
export ORACLE_BASE=/u01/app/oracle
export ORACLE_HOME=$ORACLE_BASE/product/12.2.0.1/db1
export ORACLE_SID=orcl
export PATH=/usr/sbin:$PATH
export PATH=$ORACLE_HOME/bin:$PATH
export LD_LIBRARY_PATH=$ORACLE_HOME/lib:/lib:/usr/lib
export CLASSPATH=$ORACLE_HOME/jlib:$ORACLE_HOME/rdbms/jlib
export PS1="[\u@\h \W]\$"
Now we have to save the changes which we have made in the bash_profile and this is called sourcing of bash_profile. Use the below command and once done, restart your Linux machine.
. .bash_profileWe are done with the set up of our Linux instance. Next, we have to download the Oracle database 12C and a few other software. Below is the list of that software along with their embedded links.
1. Oracle Database 12C
2. Xming
3. Putty
If you have installed the GUI version of Oracle Linux then you can directly download the Oracle database on your Linux machine or else you have to download it in your Windows machine and transfer it through WinSCP software as I did here.
Since we are using the minimal install software type of the Linux so we are gifted with the black screen. In order to get the GUI, we have Xming.
Putty is for SSH connection.
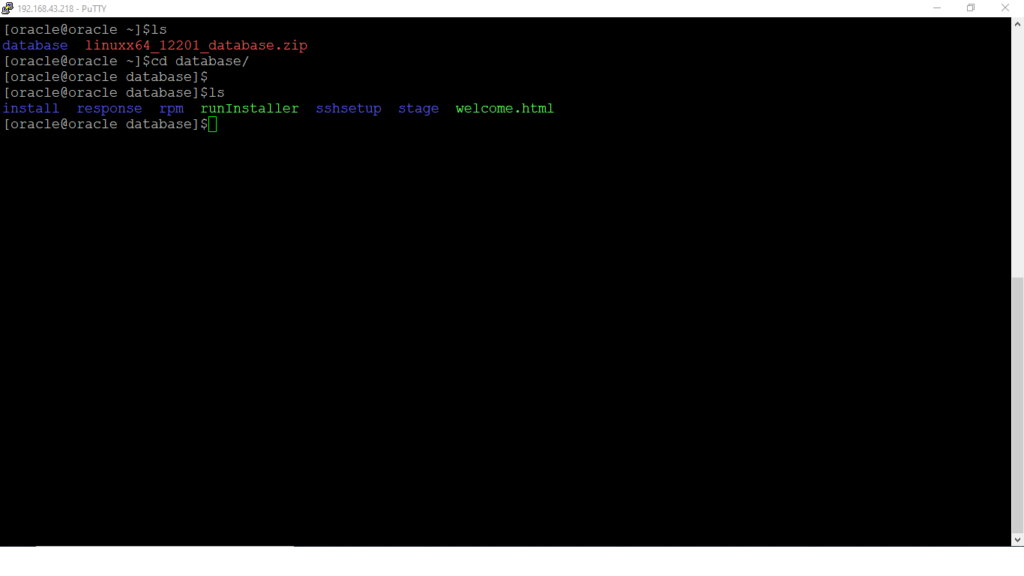
Install the Xming and Putty in your Windows system. Before you launch your VM through Putty, run the Xming and when you start Putty, don’t forget to enable X11 forwarding. This will help the Xming to open. After opening the Linux machine through Putty, just make sure you have downloaded and moved the Oracle database in your Linux machine. Now unzip the zipped database software by the following command.
unzip linuxx64_12201_database.zipThis will unzip the software and create a new directory with the name database.
Till now we are done with the configuration of our Linux machine and we have also downloaded the required software for Oracle database installation. The installation process is covered in the next blog.
[…] is the second part of the Oracle 12C installation. In the last blog, we configured our Linux machine so that we can install our Oracle database without any hindrance. […]